Getting Wi-Fi Connectivity Started You will need the following:
-
It is recommended that you use a computer or laptop to complete the steps connecting the module to your WIFI network as the larger screen makes the setup process easier.
-
You will need the name of your Wi-Fi network (SSID) and the password for that Wi-Fi network.
-
It’s recommended that your IP-Alarm module is at the alarm control panel to ensure the Wi-Fi network reaches it.
(1) From a smart phone, computer, or tablet, open your Wi-Fi settings and look for the Wi-Fi signal from the IP-Alarm module.
The Wi-Fi name/SSID will be ipalarm_xxxxxx,where xxxxxx is the last 6 digits of the MAC address printed on the sticker on the bottom of the IP-Alarm module.
(NOTE: If you see the Wi-Fi name ipalarm INIT, please see reset instructions on the bottom of this guide before proceeding.)
The Password for your individual IP-Alarm is only available by logging into your VirtuAlarm® Account as follows:
(2) Go to www.MyVirtuAlarm.com
(3) Enter the LOGIN ID & PASSWORD that was previously sent to you via email.
(4) Once logged in, visit ‘settings’ to view the IP-Alarm unique password.
(NOTE: If you are having difficulty, contact Support who can provide you with the password.
(5) Open an internet browser and enter 192.168.251.254 in the address bar.
(6) When the login screen appears, enter the username “admin” with the unique password displayed in your settings page.
Depending on how you are accessing the IP-Alarm Wi-Fi setup, none of the following screens will appear:
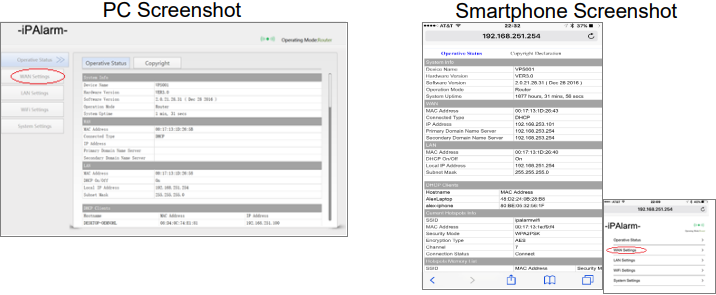
If you do not see the PC menu on the left, Click MAIN PAGE at the bottom of the page. (You may have to scroll down to the bottom).
Click WAN Settings, and the following page will appear:
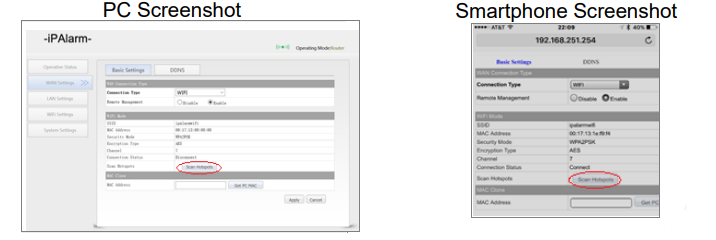
(7) At the top of the screen you will see a drop down window “Connection Type” showing “DHCP (Auto Config)”
(8) Select the dropdown window arrow and then select “(WIFI)” and a window will open listing your available WIFI networks.
(9) Click on the 2.4GHz network that you wish to connect with. (NOTE: A 2.4GHz network is REQUIRED.)
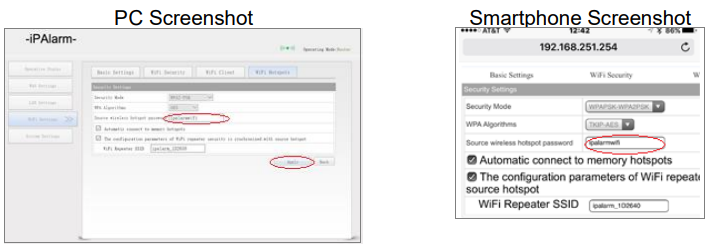
(10) Enter your Wi-Fi network password in the space next to “Source wireless hotspot password”.
(Note: If “The configuration parameters of Wi-Fi repeater security is synchronized with source hotspot” box is checked, un-select this option by clicking on the check, and the mark will erase.
(11) Once saved, you will see them message “The configured parameters have saved successfully”. (Note: If you do not see this message, save the settings again or contact support.)
(12) After saving, confirm that the information on screen is correct, then Click on “Reboot”
The IP-Alarm will make a “click” sound and then, the LEDs’ shall appear. Wait for2 minutes for the IP-Alarm to fully connect to your network and the LEDs’ have fully stabilized.
(13) Disconnect the power from the IP-Alarm Module and Wait 30 seconds.
(14) Then power the module up again.
(15) Allow 5 minutes for the 2 BLUE and the 1 GREEN LED to illuminate.
During this time, the IP-Alarm module performs a self-check and connects to our server.
If a software update is available, the module will automatically download the latest version.
If the GREEN LED is flashing rapidly and consistently, a SOFTWARE update is underway.
When the GREEN LED is on SOLID, the update is complete, and the unit is now connected to your WIFI network.
(16) Assuming you have connected your alarm control panel to the IP-Alarm using the RED connection port, the Following LED’s should be illuminated, with the exception of the WHITE LED.
-
RED LED = Power is ON.
-
YELLOW LED = ETHERNET connectivity is detected.
-
BLUE LED #1 & #2 = WI-FI is connected.
-
GREEN LED = Device is CONNECTED to our server.
-
WHITE = ILLUMINATES only if the alarm control panel is “off-hook” and attempting to send signals.
If all is good, Let’s Test your alarm into the Monitoring Center.
-
(a) Prepare your alarm system for arming by closing all doors and windows.
-
(b) Proceed to arm your alarm system and allow it to go through its arming period, usually 90 seconds.
-
(c) Once fully armed, open an instant alarm area such as a window causing a full alarm condition and not just a pre-alarm condition. Note: The alarm siren or bell will begin to sound if in full alarm.
-
(c) Since your alarm may have time delays before transmitting an event, allow the alarm to stay in full alarm condition for 90 seconds. (You should also see the WHITE LED flash, indicating the alarm control panel is sending signals to out IP-Alarm. Then turn off your alarm system.
-
(d) Wait five minutes and repeat step (c) again.
-
(e) Call the 24-hour monitoring center at 1-800-765.2580 and provide them with your alarm account number and password.
-
(f) Verify with the Live Operator that alarm signals were received from your alarm system.
-
(g) Once you have verified alarm signals, please complete the form below: